
Do you want to build an online presence by creating your own website? If you are looking for the fastest way to set up a website, you’re at the right place!
You can have a website ready in just a few clicks. This can be done by setting up a website hosting and installing WordPress on it.
There are hundreds if not thousands of hosting services out there. Some are really good and some are not that good. But there is one website hosting that stands out from the crowd.
And this website hosting service is Bluehost. I consider Bluehost as the best hosting for starting a website. It’s so simple and provides features that can help you get your website up and running quickly.
On top of that, Bluehost is also recommended by WordPress. So, if you’re starting a WordPress site, why look for other alternatives when you have Bluehost?
This guide will show in detail how to sign up and install WordPress on Bluehost in [current_date format=Y]. Plus, we have an exclusive discount coupon just for you.
So let’s begin.
Follow the steps given below to sign up and install WordPress on Bluehost:
Step 1: Visit Bluehost.com
At first, you need to go to Bluehost. (promo link)
If you follow our special promo link, you will get the best discount on Bluehost with a free domain name.
Once you are in the Bluehost.com, you will notice a discounted price of $2.95/month whereas the regular price is $8.99/month.
Now just click on the ‘get started now’ button.

Another reason why I recommend Bluehost is, it’s easy sign up process.
Step 2: Choose A Bluehost Hosting Plan
Next, you have to choose a hosting plan. There are 4 plans available and you need to choose one based on your requirement.
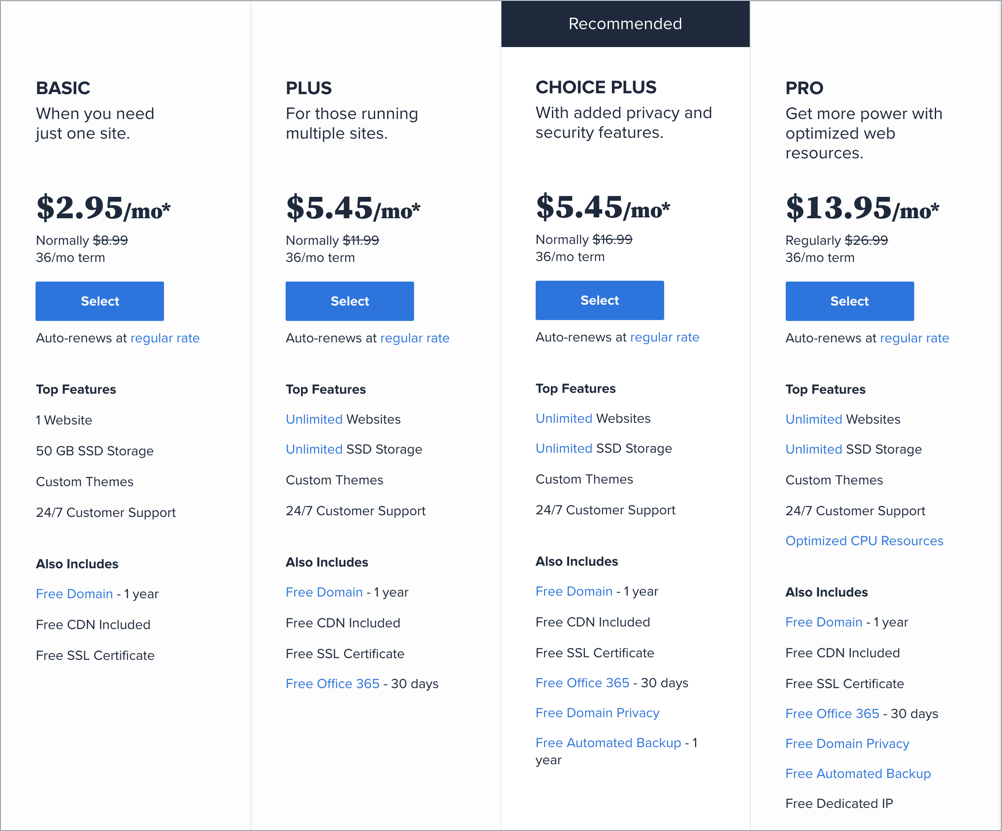
Let me break down each plan for you. (Click on the plan to know more about it)
- BASIC
- PLUS
- CHOICE PLUS
- PRO
The BASIC plan of Bluehost allows you to host only one website. You will get 50GB space which is a lot if you’re just starting your first website.
The bandwidth is unmetered which means you can grow your website without having any issues. If you don’t know what bandwidth means, let me explain:
Bandwidth is simply the amount of data you can transfer at a time. This bandwidth depends on the amount of data transferred on your website. So, if you receive high traffic to your website, the bandwidth will be high and vice versa.
So, Bluehost provides unmetered bandwidth in their basic plan which means your hosting can handle high traffic without any problems.
Apart from these features, the basic plan allows you to have 1 domain, 5 parked domains, and 25 subdomains. You can have 5 email accounts each with 100MB of storage.
If you’re starting a website for the first time, this is the plan you should go for. It’s super cheap and provides all the features required to run a website.
PLUS plan is the ultimate plan if you want to run unlimited websites on a single hosting. This also means that the plus plan provides unlimited space, unmetered bandwidth, unlimited domains, and subdomains.
You also get unlimited email accounts with unlimited storage for each account.
Bluehost’s plus plan also provides a $200 credit for marketing offers. You can spend this $200 in running ads to promote your website.
This plan is ideal for you if you’re starting a website that you want to grow fast and turn it into a business.
This is the plan recommended by Bluehost. And it’s because not only it provides all the features of the plus plan, you also get domain privacy for 1 domain, 1 SpamExperts, and SiteBackup Pro for creating site backups.
If you are ready to invest more money to start your website, then don’t even hesitate. This is the ultimate Bluehost plan to start your website and grow it.
This is the most advanced plan. It has all the features of Prime Plan.
If you need Dedicated IP, SSL Certificate, Domain Privacy, and Site Backup for all of your site, this plan is for you.
What I recommend is, start with basic or plus plan and upgrade to another plan if needed. Once you’ve chosen the plan, just click on ‘select’.
Step 3: Choose Your Free Domain Name
After choosing your desired plan, you have to choose a domain name.
Bluehost offers a free domain name. You can avail this offer immediately if you’ve already decided the domain name. Just enter the domain name in ‘new domain’ section. (1)
If you haven’t decided the domain name yet, just click on ‘Choose Later!’ (2)
And if you already own a domain name which you want to host on Bluehost, enter your domain name in ‘i have a domain name’ section. (3)

Then move to the next step.
Step 4: Create Your Bluehost Account
Now it’s time to enter your account information. To enter your account information quickly, you can click on ‘Signed in with Google’ button. (1) It will enter your will information automatically.
If you want to do it manually, just enter your name, country, state, city, street address, ZIP code, phone number, and email address. (2) Please do recheck the information you’re entering.

In the package information area, you will see the plan you have selected. The account plan by default is set to 36 months. You can change it and set it your desired time period.

There is a checkbox named Domain Privacy Protection that is already turned on. What this does is that it protects your domain information so that people cannot find the name of the person who purchased the domain.
It costs extra $0.99 per month and you can turn it off if you don’t want domain privacy protection.
Other than this, there are two more extra features named SiteLock Security and Codeguard Basic that is turned on by default. These cost an extra $1.99 and $2.99 per month. You can turn these off if you don’t want these.
But it’s important to know what these do before you turn them off.
SiteLock Security automatically scans your website for malware thereby preventing any security threats. It also performs various scans which includes XSS Scripting, App Scripting, and SQL injection.
CodeGuard Basics performs daily backups of your website and monitors your site for changes. It also provides a one-click restore feature that can be used to restore your website to its previous version.
If you really care about your site security a lot, then you should check these items as they help in protecting your website. However, I don’t think these are very important as you use a Backup WordPress plugin to keep everything under control.
There is another option named Bluehost SEO Tools Start which includes a set of tool to help your site rank well on the search engines. I don’t recommend this as there are many third-party WordPress SEO tools out there that can do this for you.
After choosing these options, it’s time to pay for your hosting. You will notice that there is just one option to pay using Credit Card. But that’s not true.
On clicking the More Payment Options link (1), you will be able to view the option to pay by PayPal.

Choose your desired payment option and click on submit to purchase your hosting.
Step 5: Create Your Password And Login
After the payment is complete, you have to choose a password for your account. Just click on the ‘create your password’ button.

Then enter your password.

After entering your password, you will see this message:

Step 6: Install & Build WordPress Site With Bluehost
Now login to your Bluehost account. You can login from My Bluehost.
The great thing about Bluehost is, it automatically installs WordPress for you.
After logging to Bluehost, you’ll be asked to choose a WordPress theme. You can choose any theme you want as you can change it later.

After choosing the theme, Bluehost will install WordPress and you’ll see this message when it’s done:

Click on the Start Building button and voila! This is your WordPress dashboard. You’ll see a welcome message where you have to choose the type of site you’re setting up: Business or Personal.

After your selection, you’ll be able to see the Bluehost dashboard on WordPress. You can directly launch your site, add a new post, add new pages, and more.

Click on Launch Site button and enter your Site Title and Description.

Now you’ll be presented with an option to choose the layout of your site. You can either set a static page or a recent news/updates page.
Here’s what these pages mean:
Static Page: If you want to set up a site whose homepage remains static or is not changed frequently, choose this option. Static pages usually include information about the website, contact information etc.
Recent News Page: If you want to add posts (articles) to your blog, then this is more preferable. If you want to set up a blog, choose this option.
Once you complete all these steps, go back to your Bluehost cPanel and you’ll see that WordPress is installed. You can go to your WordPress by clicking on the Log in to WordPress button.

There is a section with many helpful links. You can browse themes, plugins, go to file manager etc directly from the helpful links section.
Conclusion
So that’s how you can install WordPress on Bluehost. Bluehost provides a seamless installation process that anyone can install it without running into any trouble.
After installing WordPress on Bluehost, there are so many things you can do. You can install plugins for different purposes.
Spend some time exploring WordPress and what it has to offer. There’s so much available that you’ll be overwhelmed but don’t worry. WordPress is very easy to use and as you explore, you’ll notice how easy it is to create pages, design your theme and changing various settings.
Also, do explore your Bluehost cPanel. If you opted in to buy SiteLock and Codeguard, you’ll be able to access them from your Bluehost cPanel.

Leave a Reply