Are you searching for a feasible speed optimization plugin to speed up your WordPress website?
WordPress websites are renowned for their simplicity, versatility, and adaptability. However, as websites become more feature-rich and complex, they may take longer to load. The user experience and search engine rankings can suffer as a result. One of the best ways to speed up a WordPress website is by using a speed optimization plugin. By offloading media resources like images, movies, and audio files to external storage providers, such a plugin can reduce the amount of data that needs to be loaded from the website server.For website visitors, this means quicker loading speeds and a better overall user experience.
In this article, we’ll go through the details and process of an efficient speed optimization plugin for WordPress Next3 Offload.
What Is Offloading Media Files in WordPress ?
In WordPress, offloading media files refers to moving media files like photographs, videos, or other files to a server like a content delivery network (CDN) or cloud storage provider. A plugin that connects a WordPress site to the server that automatically uploads any media assets can typically do this offloading operation.
Offloading your media files to a server will help your website function and load faster. Your website’s efficiency and speed can be enhanced by unloading your media files and so reducing the amount of server space it consumes.
Even if your website receives heavy traffic, offloading media can assist make sure that your media assets are always available and accessible to your website users
The Simplest Method for Offloading Media Files?
WordPress media offloading can enhance website performance and lower hosting costs. Utilizing a plugin that automates the process is the simplest approach to unload material. This makes it easy for you to move your media files to a remote server, like a CDN or cloud storage provider.
Install a plugin that supports media offloading on your WordPress website to get going. By inputting your server credentials and establishing various settings, the majority of plugins demand that you establish a connection to your remote server. Any new media assets you add to your WordPress site should be instantly offloaded by the plugin once the connection is made.
Depending on the plugin, you may also have the option to bulk offload current media assets if you have a large library of files you want to move to the remote server.
You may verify the process was successful by looking at your WordPress media library after the media assets have been offloaded. Now, instead of pointing to your hosting server, the URLs for each media file should now point to the server.
By using a plugin, you may speed up the process and make sure that your website’s visitors can always access your media files, even when there is a lot of traffic. Better user experience, cost savings, and website performance might result from this.
The most important thing right now is to pick the perfect plugin when you’re ready to install one to your WordPress website for offloading media files. The plugin needs to have a few essential qualities in addition to being able to fulfill all offloading requirements. In such a case, as a user, I’ll suggest Next3 Offload as it is the most feature-rich and user-friendly offload WordPress speed optimization plugin.
Meet Next3 Offload Media Plugin
Next3 Offload works on offloading media items including photographs, videos, and audio files to external storage services. The Next3 Offload media plugin is a solution for boosting the efficiency of a WordPress website. The plugin decreases the amount of data that must be loaded from the website server by shifting these files to an external service, which can result in quicker loading times and better performance. Typically, the plugin connects to external storage services like Amazon S3, Google Cloud Storage to function. A link to the external version of the media file is automatically sent to the external storage provider when a media file is posted to a WordPress website by the plugin, which also replaces the original file. The media file is subsequently displayed on the website using this URL, resulting in quicker load times and better performance. An efficient technique to enhance a WordPress website’s performance and user experience for visitors is by using the Next3 Offload media plugin.
Features Of Next3 Offload
The Next3 Offload makes your website faster, transferring your media to Google Cloud Storage, Amazon S3, or DigitalOcean Spaces. After moving your current media library to the cloud, rewrite URLs. Here is the most effective way to guide you through using Next3 Offload to quickly upload your WordPress Media Library to the cloud storage.
Using the Next3 offload, you may upload files, create buckets and directories, and upload multiple photo sizes to the cloud. It significantly affects your page speed rating, indicating that search engines like Google will rank you higher as a result.
Features:
- Offload wp-media files to the cloud.
- Monitor your offload process from the settings page.
- Automatically rewrites URLs.
- Cloud Providers: Amazon AWS, Google CLoud (Upcoming), DigitalOcean Spaces (Upcoming), Wasabi Cloud (Upcoming).
- Control pause and resume process.
- Display percentage(%) of Cloud Storage & Local Storage.
- You can select many files at once and select whether to copy them to cloud storage.
- Delete them from cloud storage, or copy them back from cloud storage to the server.
- Toggle options for move or copy files from the Media Library to the cloud.
- Multiple sizes (Depend on WordPress Media sizes) copy & move local between cloud storage.
- Removes all offloaded media files from the server in the background to clear up storage space.
- Monitor your removing process from the settings page.
- Control pause and resume process.
- Display percentage(%) of Offload files & Local files.
- “A single click” offloaded files loaded into WP Media Library.
- Display into WP Media & Select file for use anywhere into WordPress (Posts, Pages).
- Easily get your offloaded media from Cloud.
- There is no need for scripts or the command line.
- Transfer files to a new storage location.
- Add media items that already exist in the cloud.
- Increase the speed with which CSS, JS, Fonts, and other assets are delivered.
- Optimize site speed. So your server is no longer required to serve files like images, zips, PDFs, videos, CSS, and JS.
- Users can use the drag and drop system to upload their most important files.
- The user can upload files via the AWS file management to any directory in WordPress.
How Does Next3 Offload Allow You To Offload Media Files?
You can offload media files to cloud storage services like Amazon S3, DigitalOcean Spaces, or Google Cloud Storage with the WordPress plugin Next3 Offload. To offload media using the Next3 Offload as a speed optimization plugin, follow these steps:
- On your WordPress website, install and activate the Next3 Offload plugin.
- Choose the cloud storage service that you want to use by going to the plugin’s settings page. To link your WordPress site to your cloud storage account, enter your login information.
- Set the plugin’s options, including the name of the storage bucket, the organization of the folders, and the cache options.
- All new media files you upload to your WordPress site after installing the plugin will be immediately offloaded to your cloud storage account. By using the bulk offload function of the plugin, you may also decide to offload already-existing media files.
- To confirm that your media files have been correctly offloaded, check your cloud storage account. Instead of your WordPress hosting server, you should see your media assets stored in your cloud storage account.
You may quickly and automatically offload your media files to a distant cloud storage server by utilizing the Next3 Offload plugin. The burden on your WordPress hosting server can be lessened, website performance can be enhanced, and hosting costs can be decreased.
Storage Settings
You will receive a flawless control panel once the Next3 Offload installation and activation process is completed. Go to the Storage Settings first. You can change or configure the Provider from here. Choose Edit from the menu.

The Edit option will take you to a new page where you must choose the necessary provider and enter the supplied and previously saved Access key and Secret key.

Then return and select the Edit Bucket Settings option. You can also use the designated button to enter the File Manager.

The next section will appear after selecting the Edit Bucket option, from which you can create a new bucket, browse an existing one, switch providers, and add any already-existing file to the bucket. After making any adjustments or establishing new buckets, make sure you always select Save Bucket Settings.

Visit the Storage Settings page once more. The Preview URL is displayed here.
Turn ON the Offload Media Files to Storage Provider button in General Options.
If you want to copy the media files to the local server once they have been uploaded, toggle ON the Copy to Local Server option, which is also present.

You can now configure the bucket route. Turn ON the following button to add Prefix. Enable the Add Year & Month the bucket path button once the prefix for the year and month has been added. By turning on the option Add Object Version to The Bucket Path, you can add time as minute to the bucket path after year and month.

You can upload many mime types of file formats to the cloud using File Management. Turn the necessary option ON to accomplish it. You must choose the file extension here as well.
By enabling the Remove Local Media button, you can free up storage space by deleting the local media files.
After uploading the files, you may also remove them from the cloud (or bucket) by turning on the Remove Files From Cloud button. Here are the fields for choosing the amount of pages and the offload limit.

After making any changes, never forget to click the Save Settings option.

Delivery Settings
Go to Delivery Settings now and choose the delivery service you require. After that, you can add a custom domain name to the field that is necessary.
You can rewrite the media URLs in the General Option. If you want to utilize HTTPS instead of the current page’s scheme for every offloaded media item, enable the option for Force HTTPS.
You can upload media assets by rewriting URLs from chosen Delivery Providers consistently while using Force CDN Delivery. After making all necessary adjustments, select Save Settings.

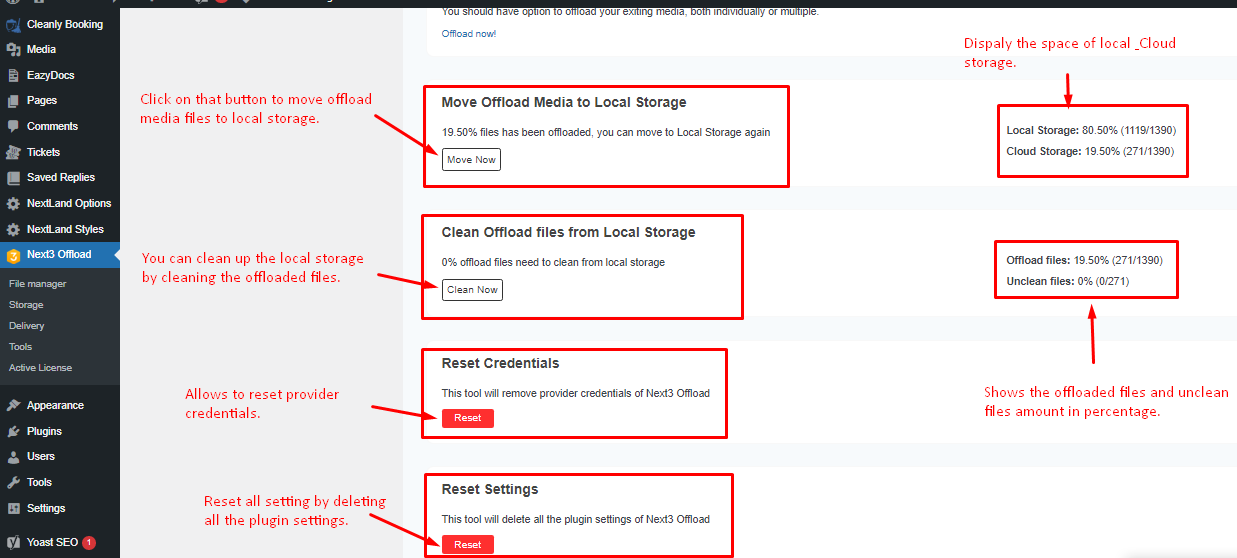
Tools
The Tools section is located below the Delivery Settings. You can upload your current media files from here, as well as examine the proportion of files in cloud storage and local storage.
By selecting the option for Individual Offload Existing Media, you can offload both single and numerous media files.

To move the media files to local storage, select Move Offload Media to Local Storage.
The percentage of files stored locally and in the cloud is also shown in this area.
You can also use Clean Offload files from Local Storage to remove unwanted files from local storage if necessary. Offloaded files and dirty files are both displayed here.
The options to Reset Settings and Credentials are also available.
Active license
This section relates to the Active license. In this section, all licenses related options are accessible. Access all you require.

Live Demo
You can access the plugin’s feature as a demo by clicking Live Demo. It will assist you in developing a comprehensive understanding of the fantastic features of this plugin.

Final Word
Using a speed optimization plugin like Next3 Offload, your WordPress website can be significantly speeded up. You can lessen the burden on your web server and improve the delivery of your media files to users by offloading your media files to a different server or cloud storage provider. As a result, load times might be quicker, user experience might be better, and search engine rankings might be better.
For WordPress, a number of speed optimization plugins are available, each with a unique set of capabilities and advantages. It’s essential to pick a plugin that works with your website and satisfies your own requirements. You may advance your WordPress website and offer a quicker, more effective user experience with the appropriate speed optimization plugin.
Leave a Reply